An Introduction to Making Models for Hytale
Hello, I'm Thomas Frick, and I've been art directing Hytale for the past decade.
Today, we are so happy to finally share some tips and tricks to get you started on making models in the Style of Hytale.
There is so much to say on the topic! Consider this as an introduction to a larger series of share-outs about the Hytale Art style. Now, buckle up!
ONE ART STYLE TO BIND THEM ALL
Hytale is a vast game containing many universes and themes...You could be visiting Orbis, end up in minigames shooting aliens, or riding dinosaurs in a prehistoric world!
No matter what you see in-game, we aim at building a consistent and emblematic art style across all game modes and media we craft (Concept art, UI, Modelling, Animation, VFX, Level Design) and a lot of thought has been put into it. We want players to feel like what they are experiencing is part of the same universe - the world of Hytale.
In any game, Art Direction is the glue that binds every aspect together and maintains a consistent, enjoyable immersion. It will support game design and lore and ultimately generate player delight.
Hytale Art Style
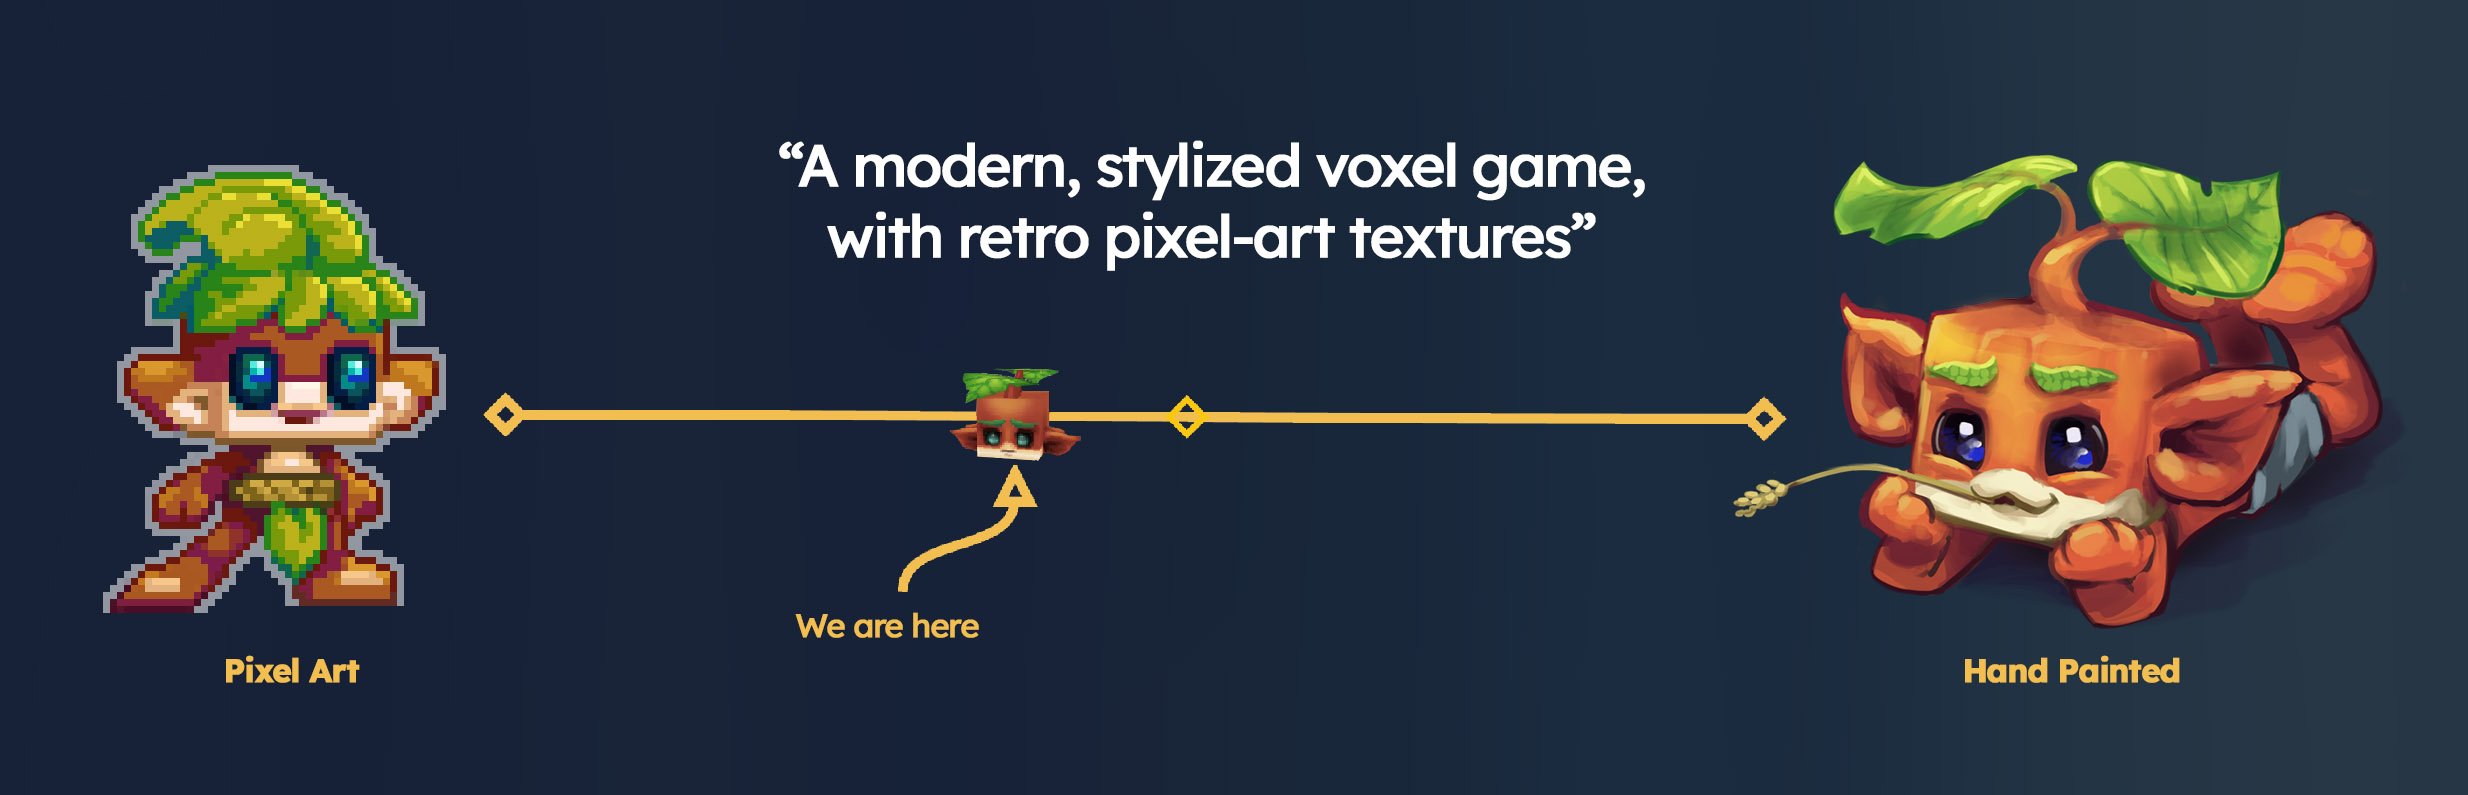
"A modern, stylized voxel game, with retro pixel-art textures"
Hytale art style was born of a combination of influences. By fully leveraging modern game engine capabilities while preserving the charm of our old-school pixel art, we are at the intersection of low-definition pixel art and hand-painted 3D.
The Art Pillars
We have distilled the essence of Hytale's style into what we call the Art Pillars. Every time we create something new, we ask ourselves: Is this compatible with our core visual Pillars?

- Immersive: We aspire to make our world feel alive, and for its digital nature to vanish. Art helps maintain the illusion of this lively world: There is motion and detail everywhere. Wind blows in the leaves. Creatures wander around. Clouds travel and let light pierce through. The world reacts to the player - creatures interact with them, their eyes express emotion and interest. We aspire that the game's visuals will leave a lasting impression on players' memories.
- Fantasy: Hytale is deeply Fantasy, but isn't limited to our core Medieval Fantasy world of Orbis. Our Art style remains recognizable and consistent across universes, stories, and themes. Each character we create has a unique personality and twist, even when we reuse popular archetypes.
- Stylized: This is visible through our proportions, color palette, and stylistic choices. Our models aim to be iconic and easily identifiable so players can read the world they navigate, regardless of how cluttered the space is. Simplicity is key; it doesn't mean low quality, and it takes many iterations to achieve. We carefully select which parts of the geometry to preserve and which to discard to achieve consistency.
- Flexible: Because our models are composed of primitive shapes like cubes and quads, it is also very easy to understand how they're made. When creating them, we keep the technical structure simple enough to be easy to comprehend, iterate on, and read, so our artists and users can make it theirs! Our tools are designed to be used and shared by everyone, and this is the true goal of Hytale: empowering user creativity.
The Hytale Renderer
The game wouldn't look as great without the technology bringing everything together.
As described in the blog post about technical requirements, our engine is designed to run efficiently on older computers, prioritizing speed while also displaying an impressive number of elements at a satisfying view distance. We want our game to be playable by as many people as possible, so it will always be a matter of compromises between what's beautiful and what's performant.
We aren't using the industry standard PBR workflows (roughness, normal maps, displacement, etc) - it is really tailored to elevate the art style in its unique way.
We avoid applying effects that would damage the handcrafted texture style. The shading modes, shadowmap, SSAO, fog, and bloom we apply to our world are the cherry on top, making Hytale feel cozy and vibrant. Ultimately, even without any effects, our models should look good on their own.
- We paint lights and shadows inside textures and use real lights/shadows to bring everything together.
- We aren't using PBR workflows to create complex material effects; instead, we rely on in-house light propagation techniques.
- We apply a selective set of shaders and post-processing effects, such as Bloom, Depth of Field, and Ambient Occlusion.
What's next for the rendering engine?
Rendering deserves its own blog post. But it will continue to evolve significantly. In the future, we plan to address some visible light propagation issues and add colorimetry and gamma features, allowing us to gain more control over the color grading of the game. We are also exploring more flavorful features, such as godrays, transparent glass, and many other surprises!
MAKING MODELS FOR HYTALE - GETTING STARTED!
So… Now that you have had a glimpse of the theory, you are probably eager to know more about how to start making models. Well, let's dive in.
Note: These are best practices; you don't have to follow them strictly. You are the masters of your own craft, and there is no good or bad way to create as long as you are having fun.
Blockbench Plugin
Download the latest Blockbench and the Hytale Blockbench plugin here. Source code for the plugin can be viewed here.
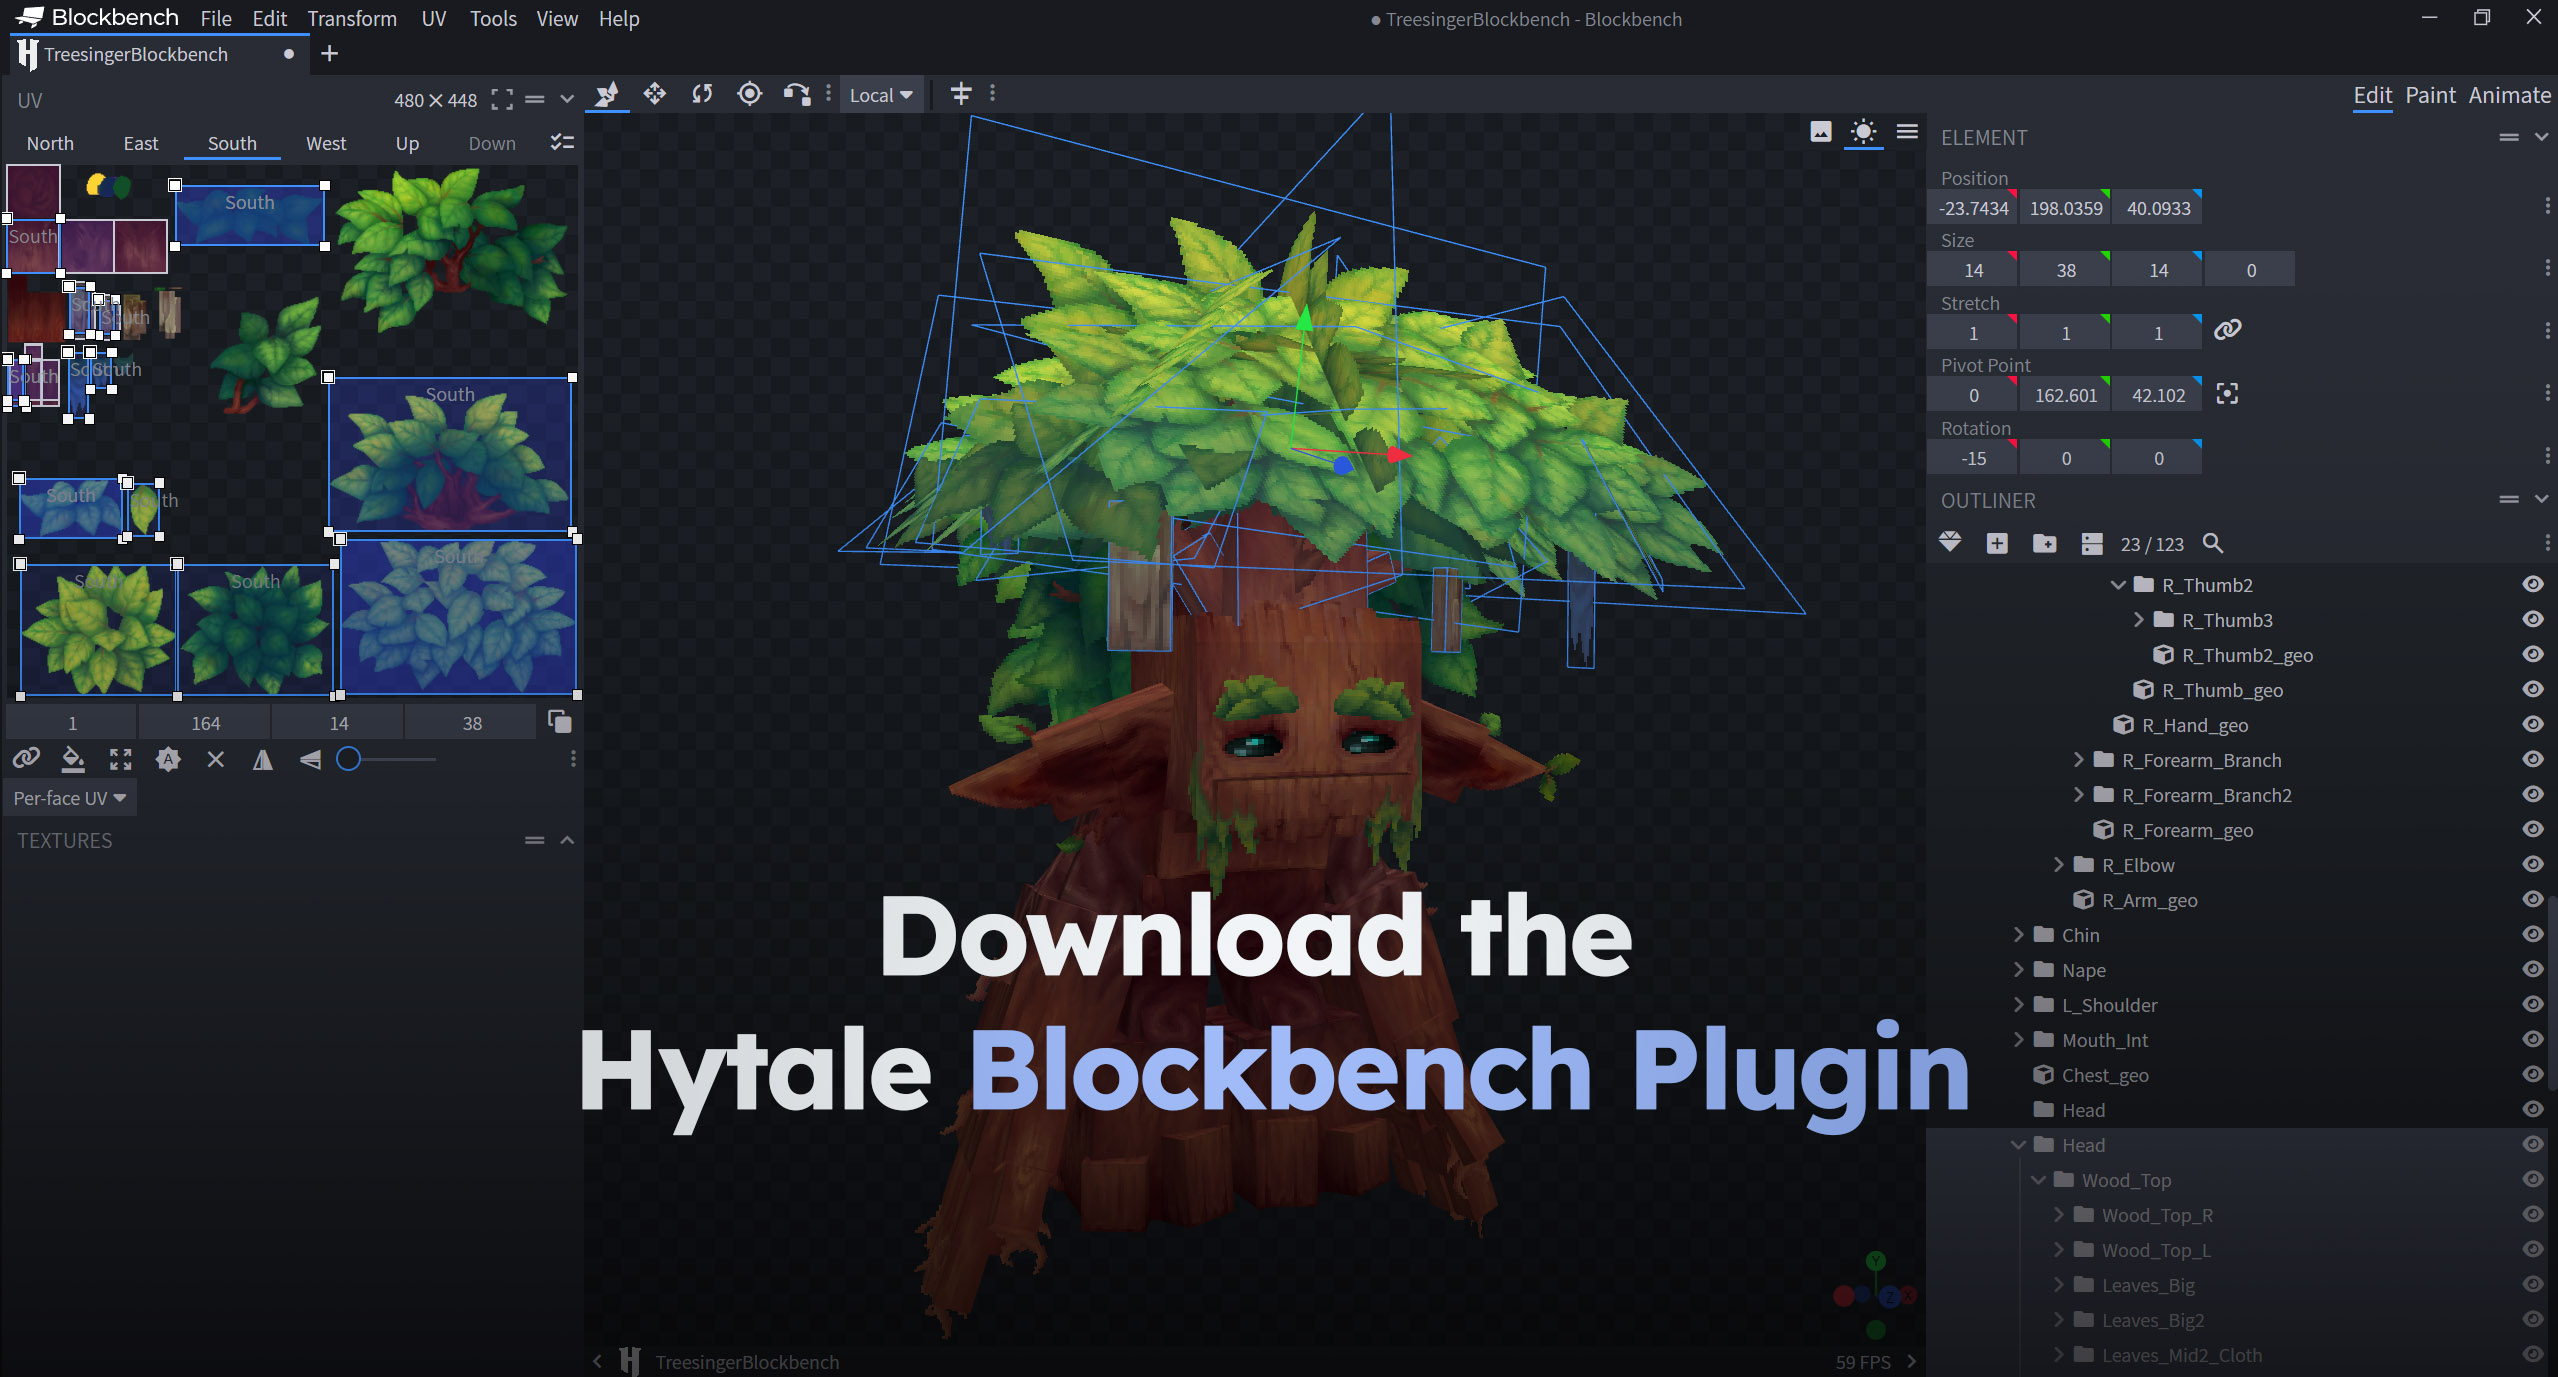
To help you build models, we are releasing a Blockbench plugin tailored to our engine's needs. Please note that this plugin is also in early access, and you might encounter bugs. We will continue to make it more efficient and feature-complete soon. This plugin helps maintain a consistent pixel ratio across textures, enabling the export of models and animations in the correct format, along with other quality-of-life improvements detailed in the plugin patch notes.
Our Geometry Constraints
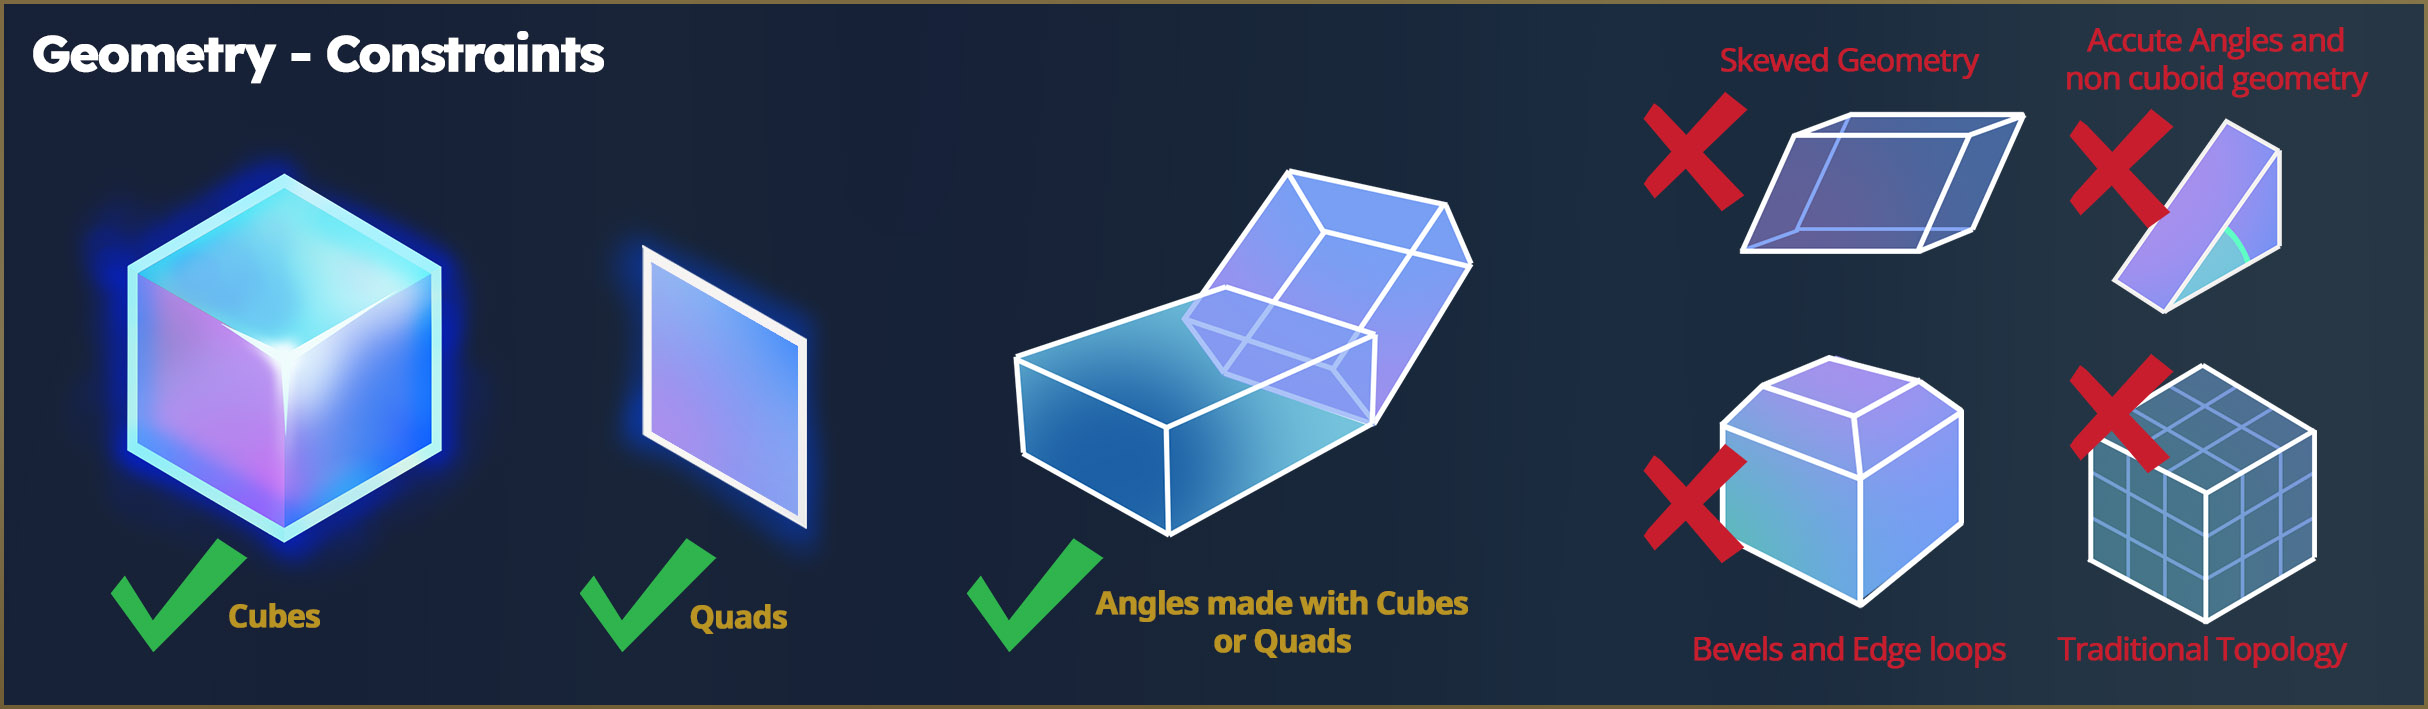
When making models, we only use 2 primitives:
- Cubes (6 sides)
- Quads (2 sides)
No edge loops, no special topology, no triangles, pyramids, or other functions of more traditional modelling styles. This ensures all models are easy to make, unwrap, and animate, and don't require Weight Painting, rigging, or a 3D Art degree to get started. The Blockbench plugin will help you keep everything simple!
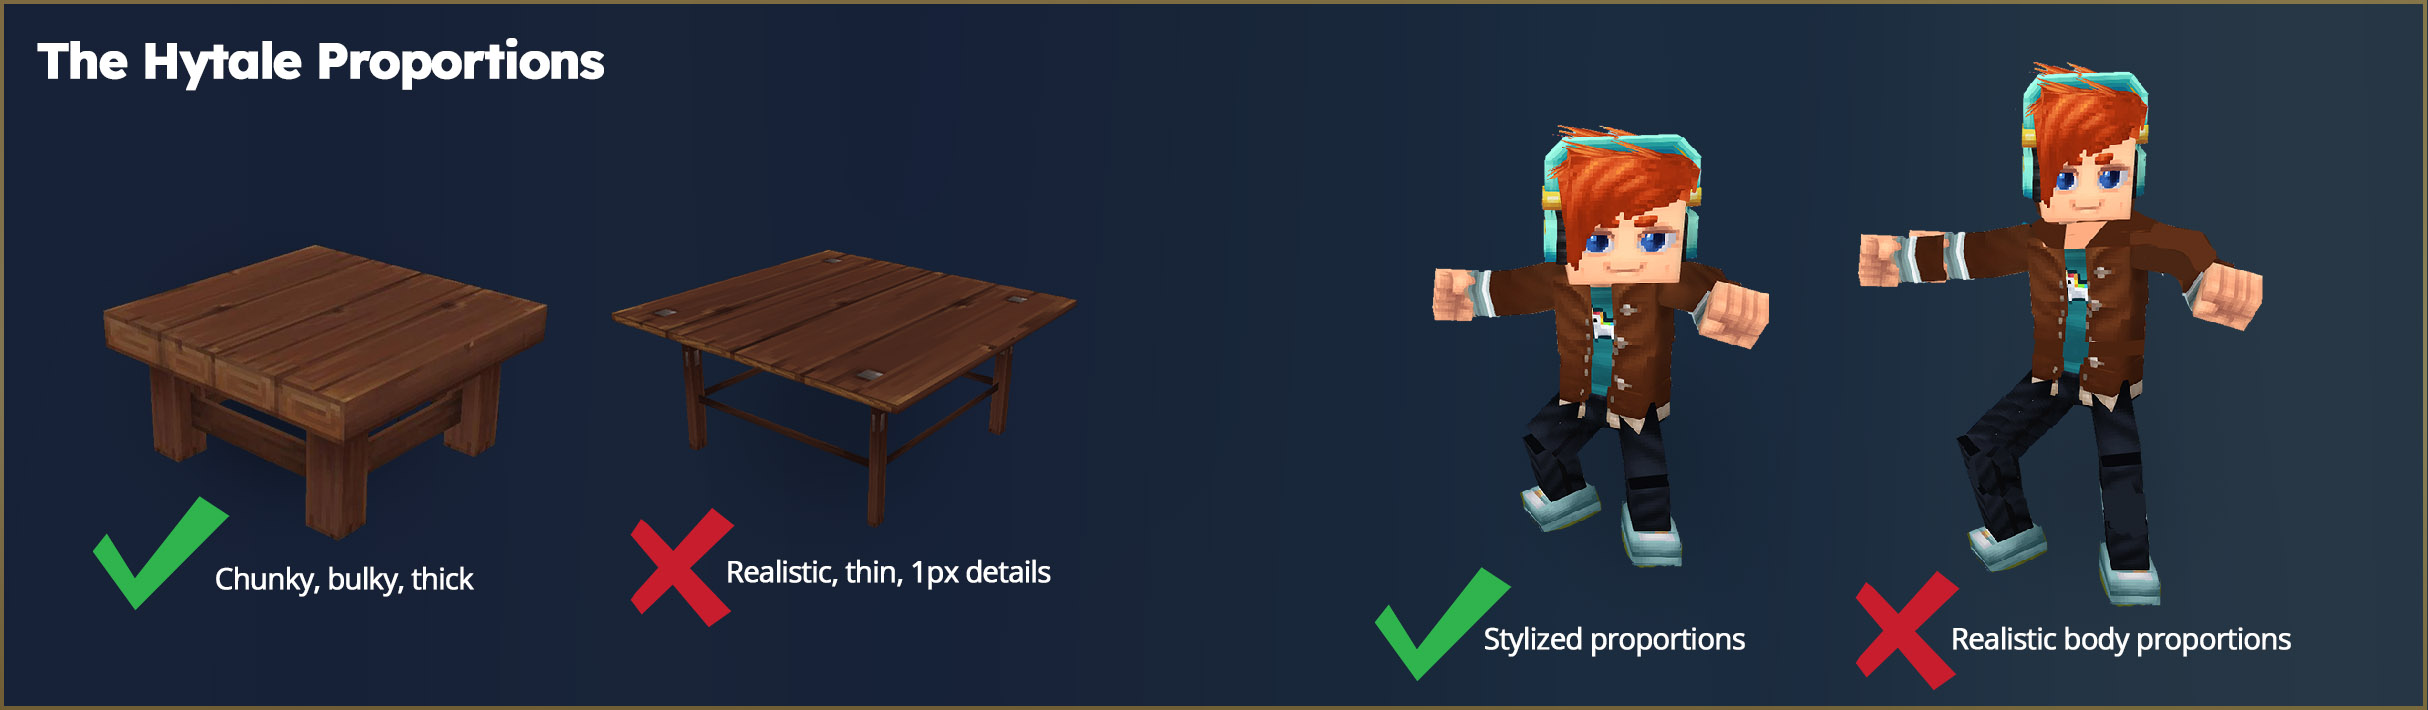
The Hytale Proportions
The character bodies are far from realistic. They are small, bulky, and cartoony. This supports the cartoony, chunky style used in every other element of the game. Similarly, blocks and furniture are "toylike" and have pure and iconic shapes.
When creating characters, we carefully name each node to make it compatible with our animation system. As soon as the bones are properly named, they will be animated in-game.
If you are curious, here is an example of the player's hierarchy of bones in Blockbench (click to open full image)
Oh, and don't forget…No spheres allowed!
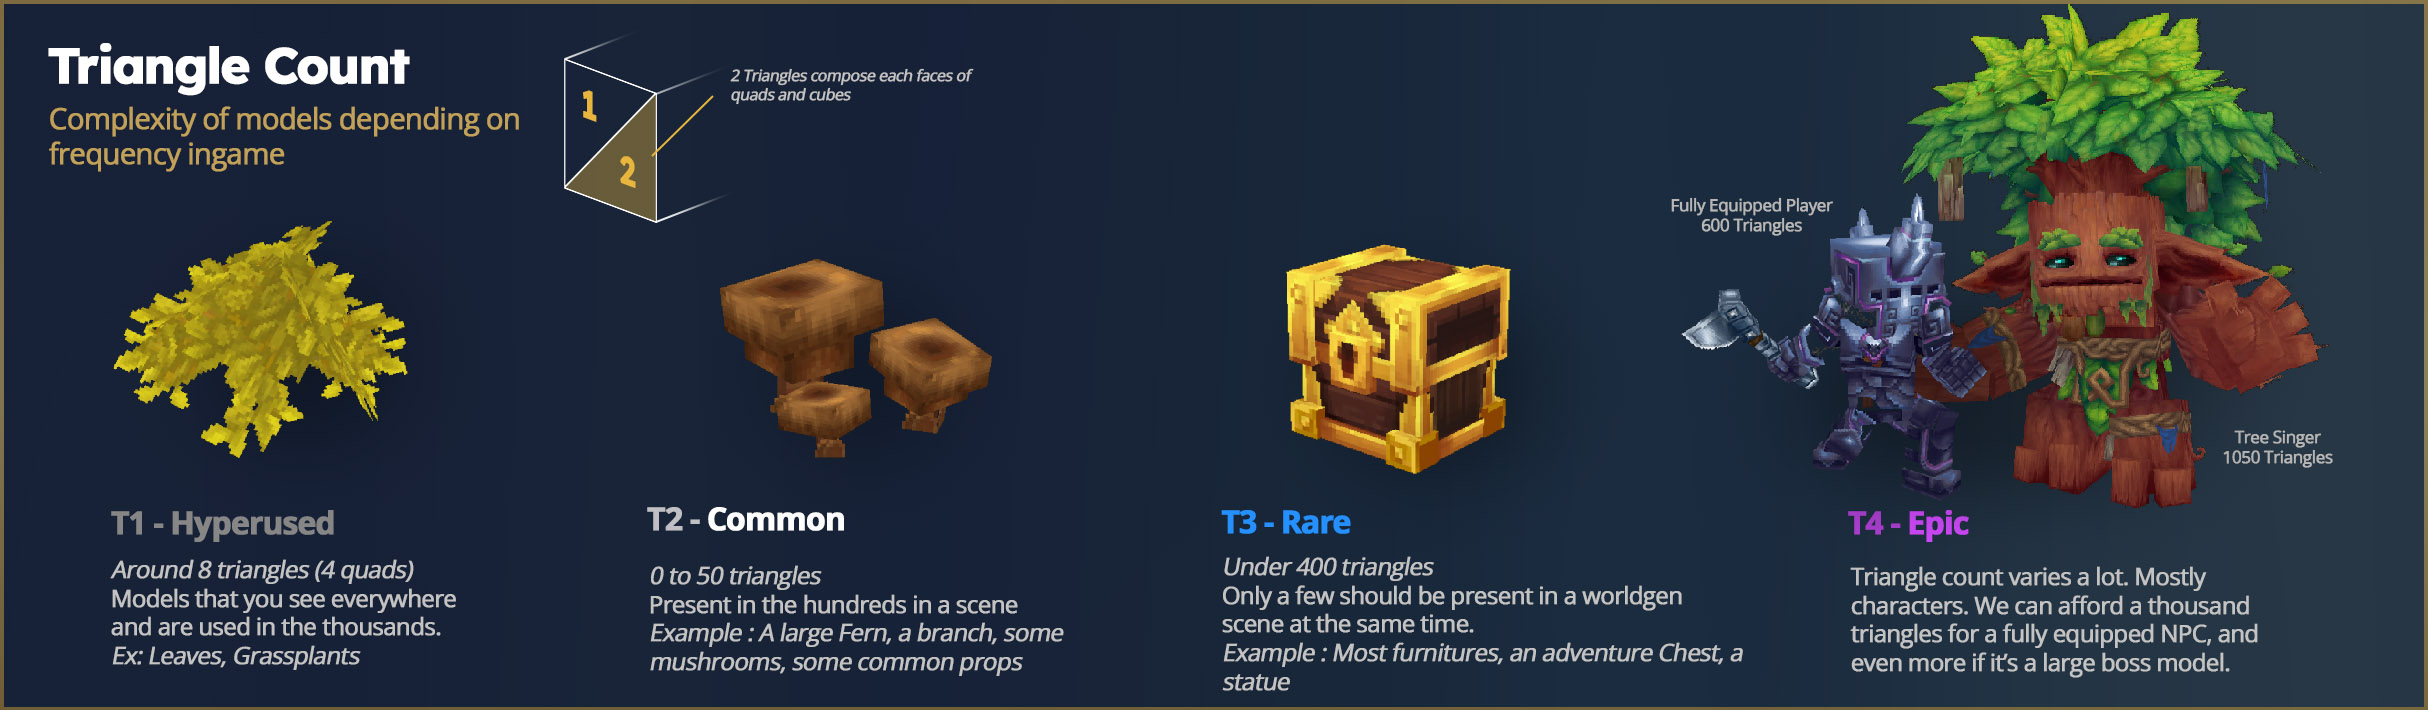
How Many Triangles Do I Put In My Model?
We work as simply as possible, then slightly increase geometry and polygon count when needed to improve the silhouette. This isn't only a stylistic choice; it is also for performance reasons. In many scenes, Hytale renders several thousand blocks and voxels simultaneously, resulting in several million triangles per frame. Triangles are a major contributor to framerate (FPS) loss.
To minimize impact on the graphics card (GPU), artists need to ensure models are highly optimized. Here are some examples:
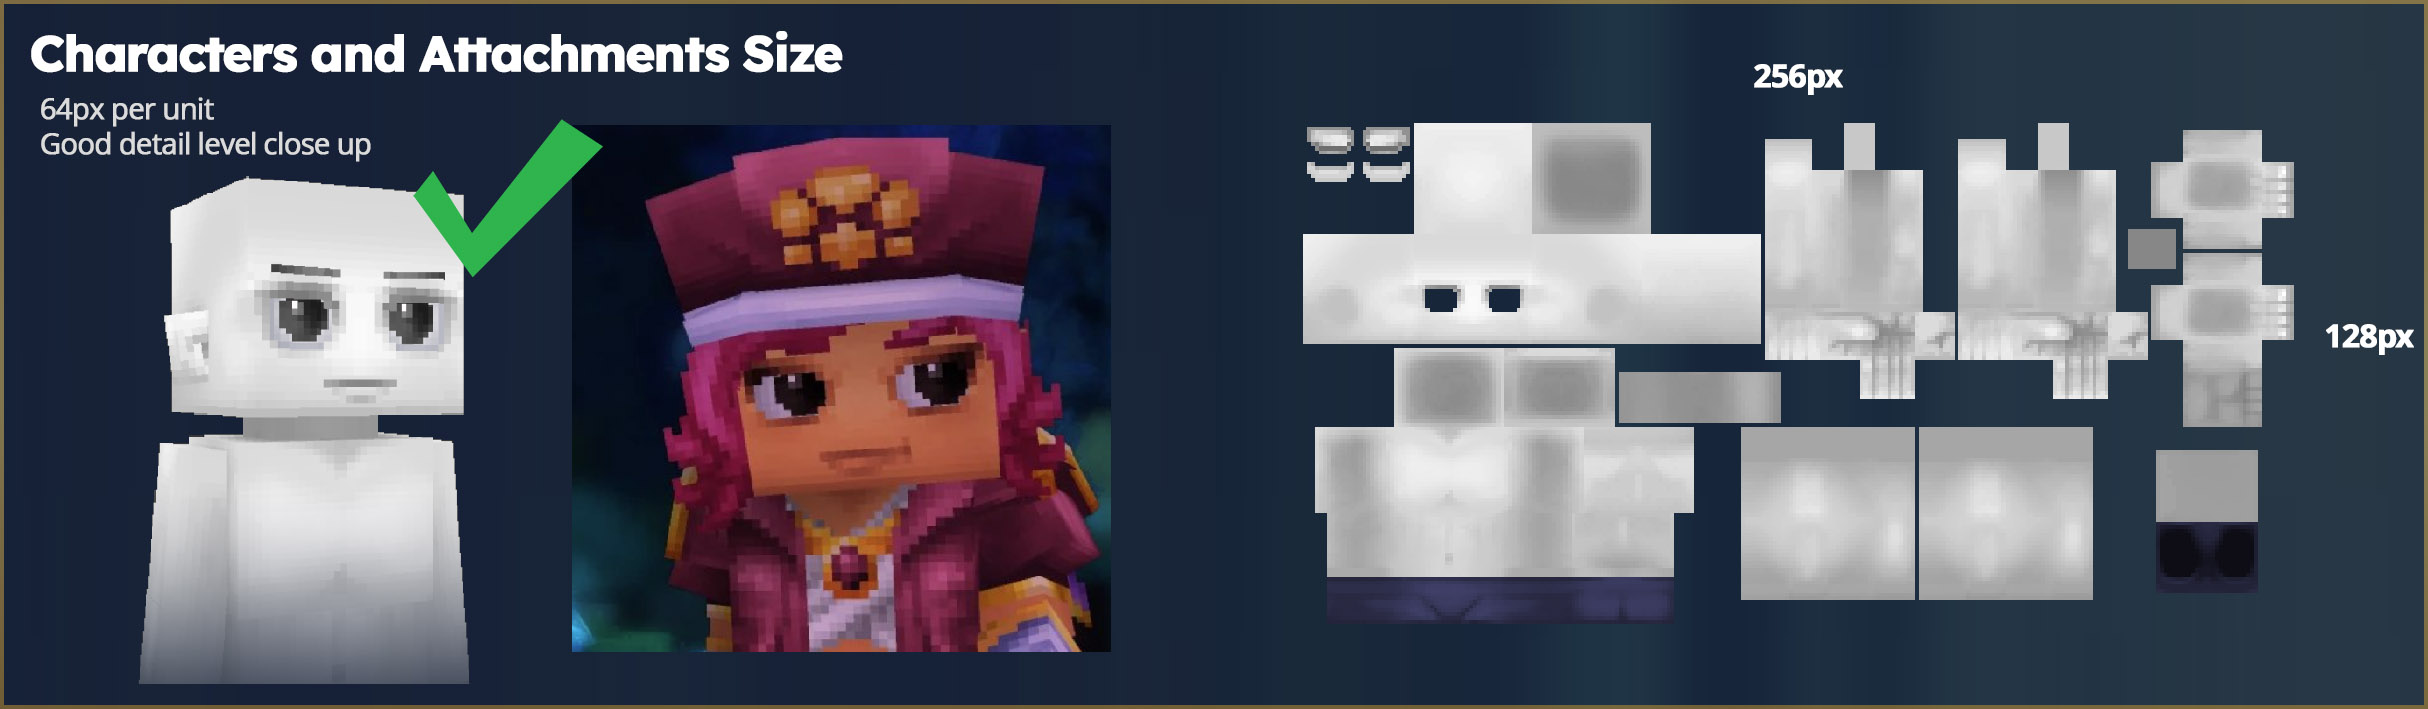
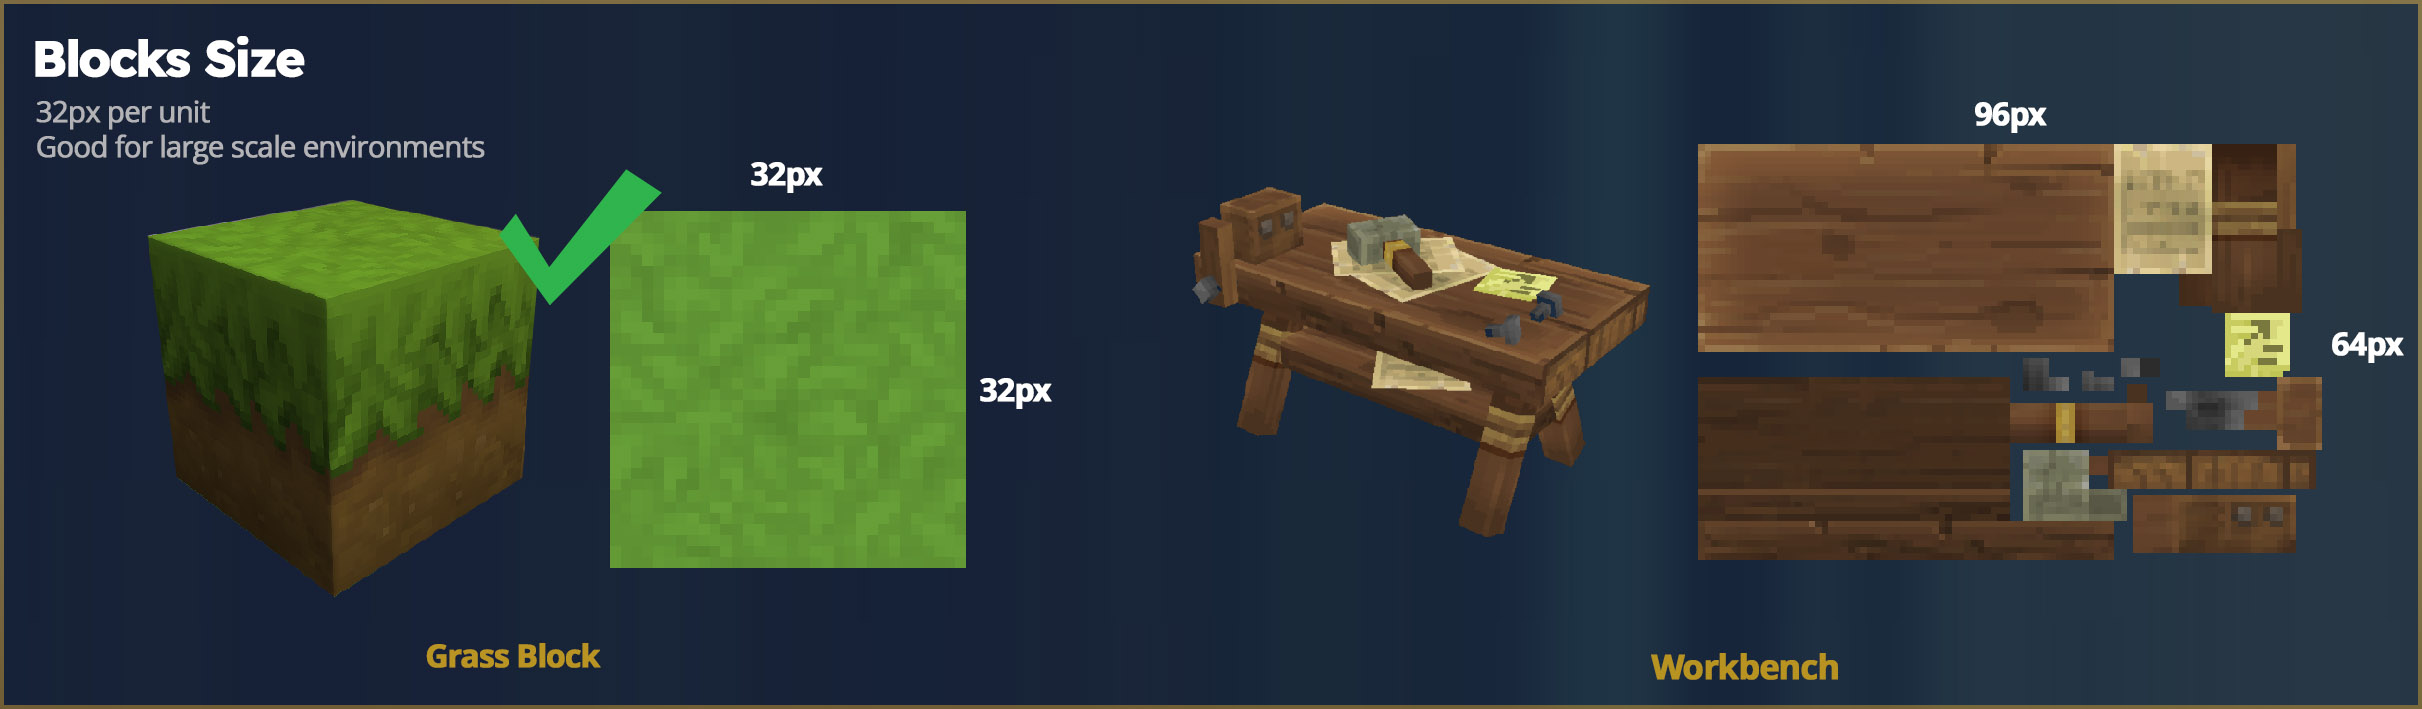
What Size Should My Textures Be?
Textures can be non-square and must be multiples of 32px (32, 64, 96, 128, etc.). Here are some guidelines depending on what you want to create! Blocks and Characters texture texel density ranges from simple to double, and the engine automatically scales characters/attachments down to match the world size.
So when modelling, you are presented with two options:
- Make a Character/Attachment (Cosmetic, Tool, Weapon, Food item) = Density will be 64px per unit
- Make a Prop/block (anything else from cubes to furniture) = Density will be 32px per unit
This important decision was made after careful consideration and is a matter of compromise. Here is what we have learnt:
- Hytale is about conveying emotions: higher density for characters allows for details on skin, tattoos, makeup, eye and mouth motion, etc. It allows for more life to be injected into faces. We felt constrained by the lower resolution.
- The faces of characters and creatures are what you see first - from very close up - especially in first person, when fighting, or interacting with other players. Large pixels in front of the camera tend to distract from the beauty of the world and break immersion.
- Higher density for characters helps them detach from the environment and enhances the overall readability of the scene, avoiding a chaotic perception of space because it attracts the player's eyes toward what they should see first.
- It helps show more details in cosmetics and offers more personalization options for logos, materials, grainy textures, ornaments, and more.
- In first person, it helps with the visuals of your hand or weapon/tool/equipped item, which can look distracting close to the camera.
Keep in mind that during early access, many avatar customization features will unlock progressively. We will keep improving visuals and adding options in future updates!
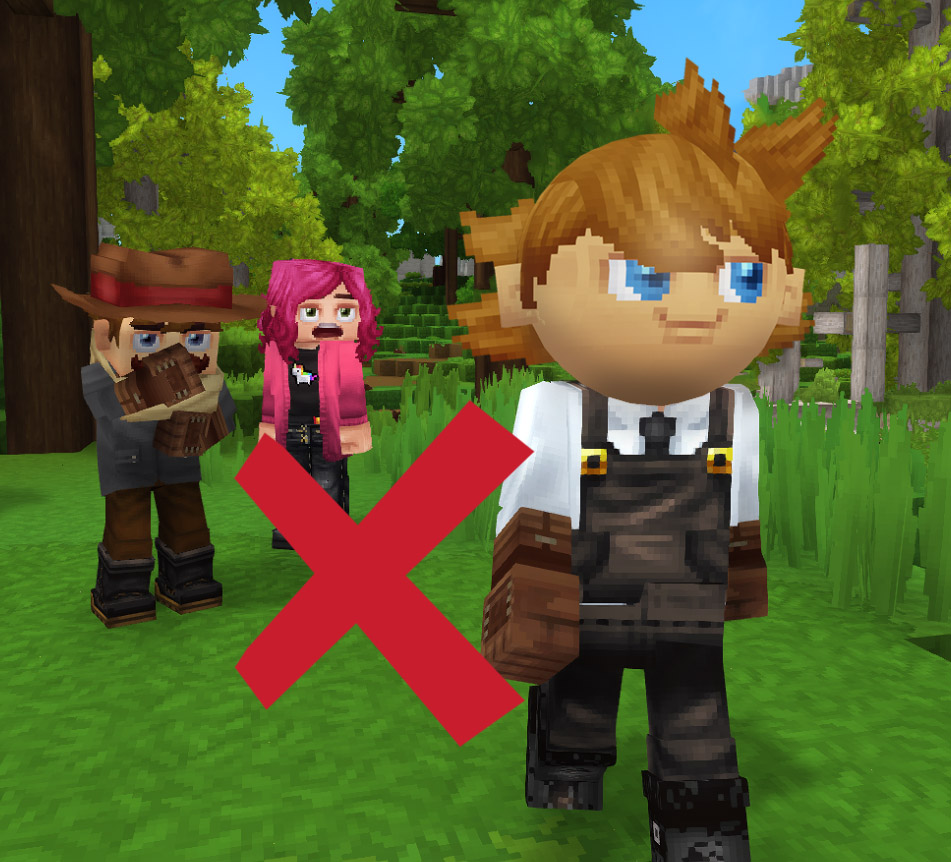
If you're wondering why the player texture is grey, it's because we dynamically tint it in-game!
 block
block
STRETCHING!
We also allow stretching geometry, which will stretch the pixels at the same time, in order to do some fine adjustments (e.g. to avoid Z-fighting when geometry overlaps) or when we need to slightly resize something. This is our way to go around pixel density limitations and cheat a little if needed.
However, we avoid going under 0.7X and over 1.3X the stretch for a node in one axis. After that, it becomes clear that the pixels are stretched. See for yourself - we made it very obvious here.

WHICH BRUSH SHOULD I USE TO PAINT MY TEXTURES?
It's a question we often get, but texturing for Hytale actually doesn't require many special brushes to get started. Use any painting software like Photoshop, Gimp, Clip Studio, Affinity, Krita, Blockbench or Procreate to do the job.
Here are two very simple brushes we use often:
- Use the Pencil brush with opacity on for details.
- The round soft brush, with opacity pressure on, for softening surfaces and creating volume.
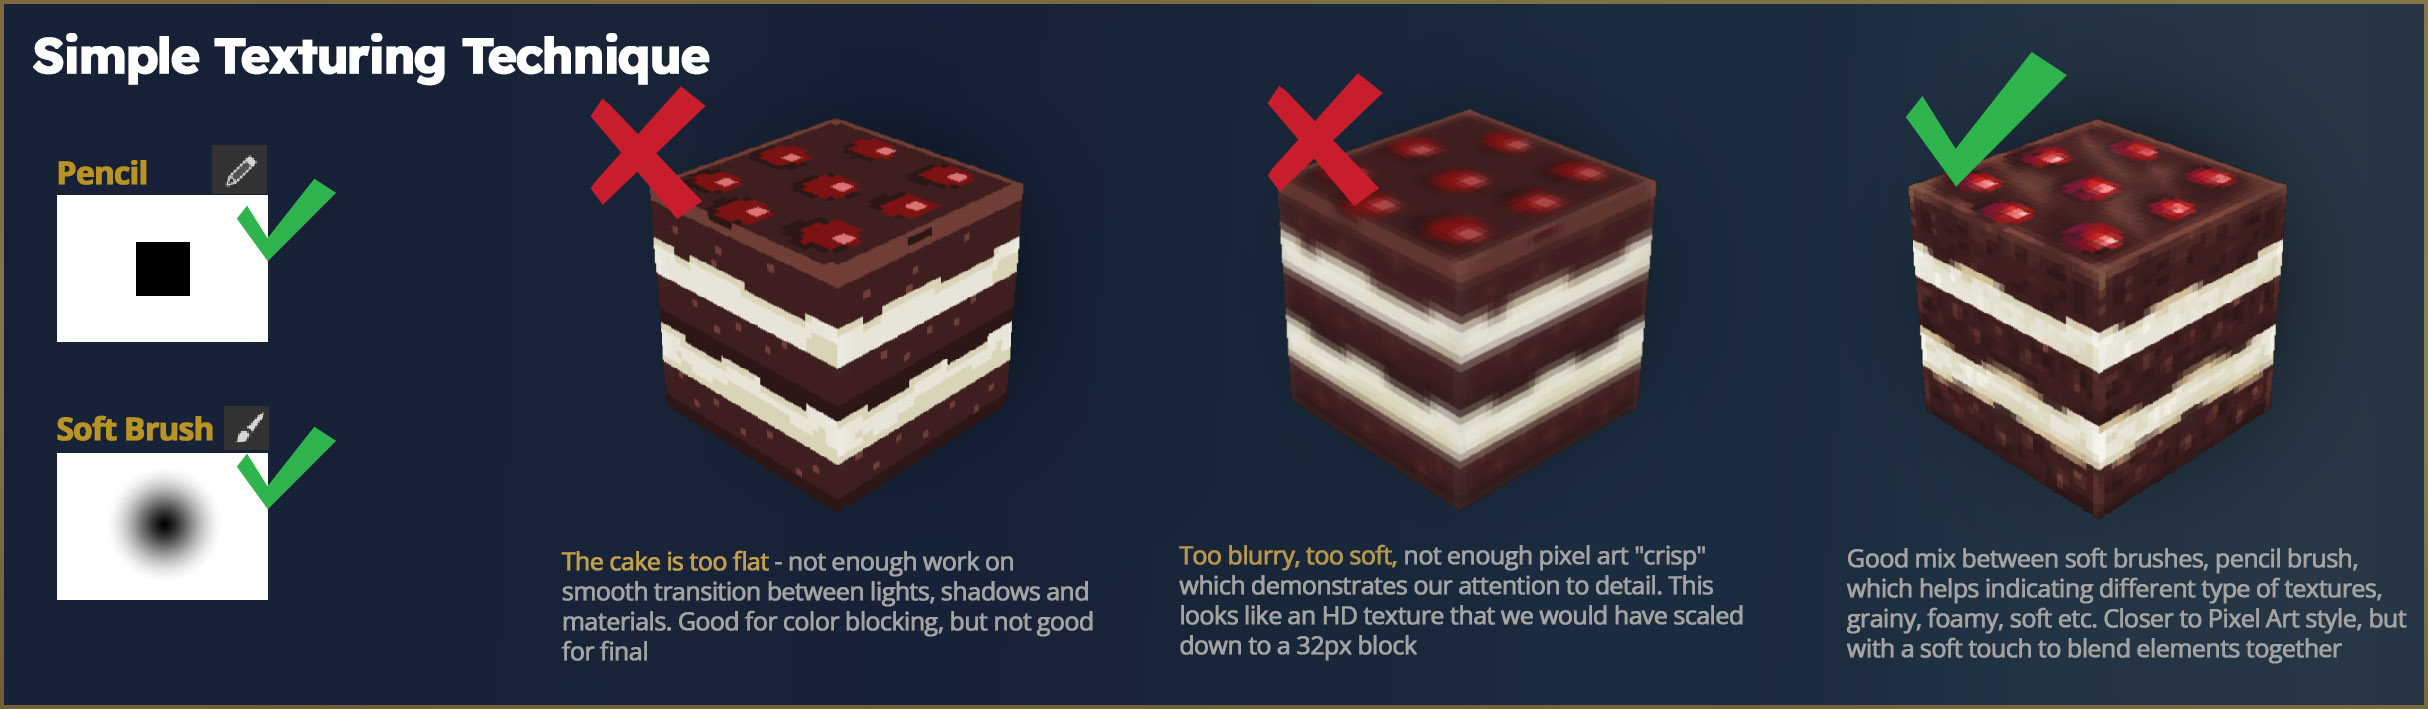
Pencil for color-blocking Soft Brush for smoothing and shading Opacity Pencil for polish
Of course, you can use any brushes you want! Your art style is yours, and don't let anyone tell you otherwise.
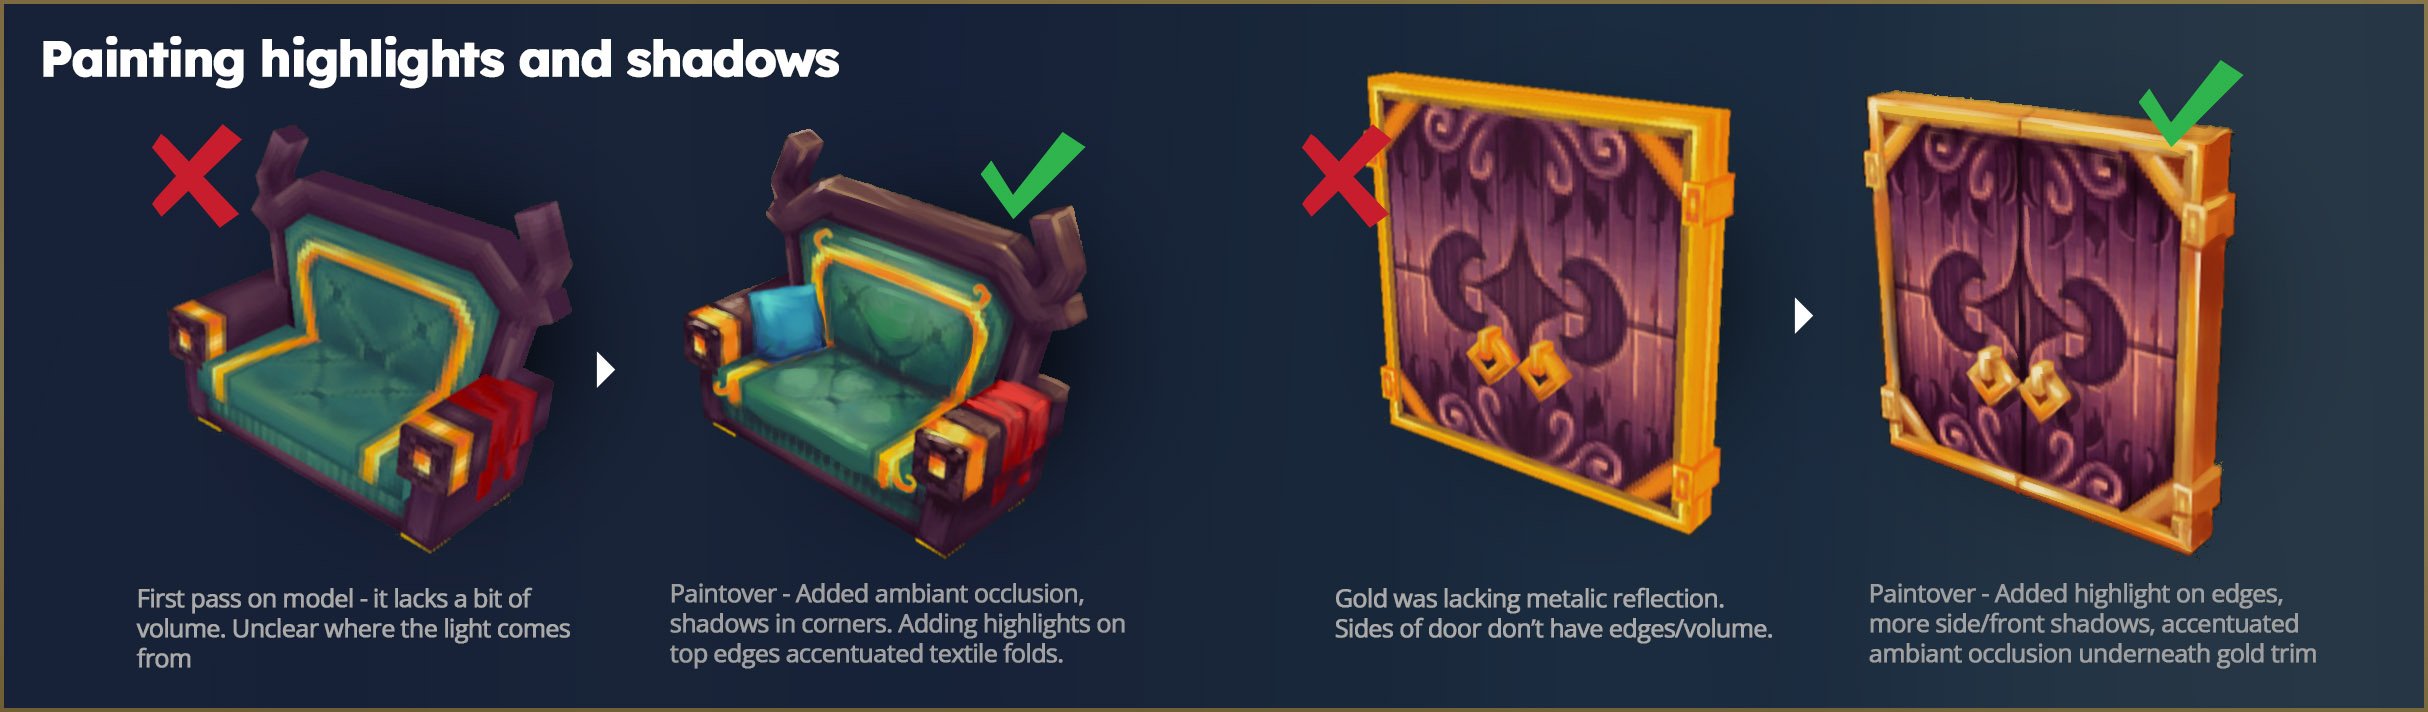
The key element is that we treat each texture as an « illustration » in the sense that we often paint/bake shadows, ambient occlusion, and highlights directly into the texture to simulate more complex lighting than there really is in the game. It's all a matter of creating an illusion of detail when there isn't that much! We avoid noise, too much grain, or perfectly flat surfaces.
HOW DO I PICK GOOD COLORS FOR MY MODELS?
Apart from what art theory will teach you, there aren't real limits for picking colors.
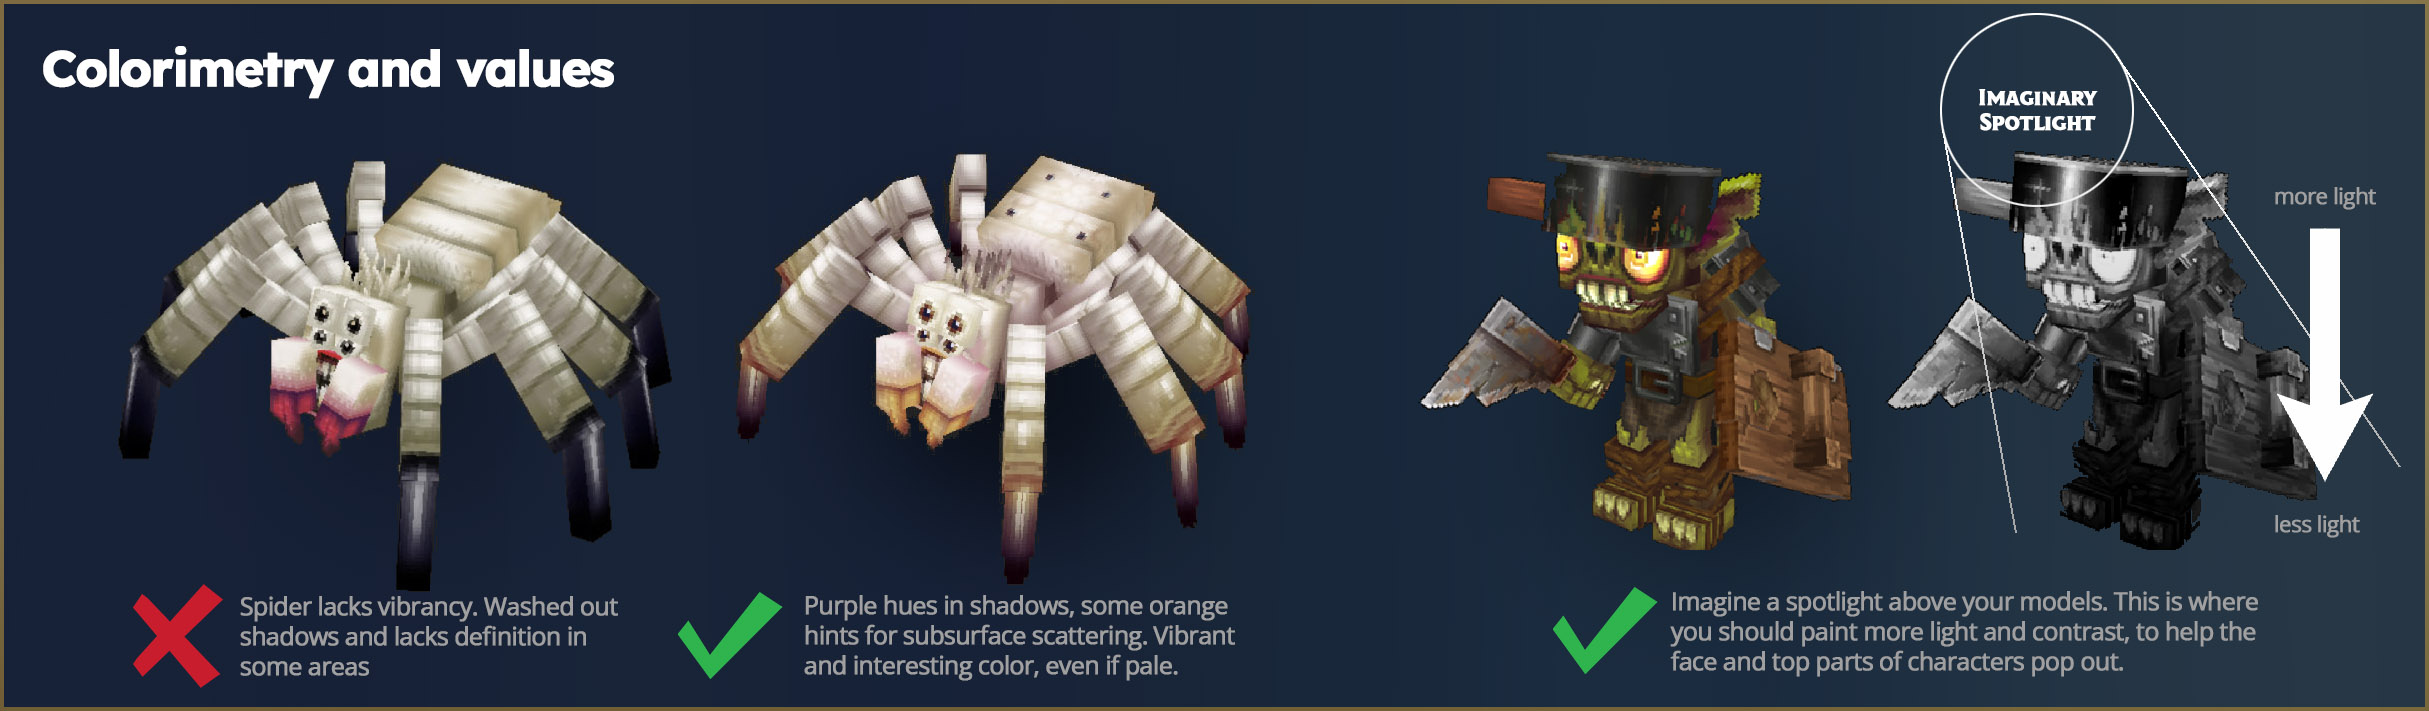
- Avoid pure white and pure black, as this will break lighting ingame, add too much contrast and ruin your values.
- We tend to add color in our shadows - they are never purely desaturated color, and always contain nuances. For example, a hint of purple in the shadows will sometimes make a model more vibrant.
- To understand if your color palette and values are on point, there is nothing better than trying to implement your model ingame once the game is out
SHADING MODE AND MATERIAL
If you are working on a character and want to showcase it from blockbench, we recommend disabling side shadows to avoid creating a hard edge effect on the body, especially if you try to simulate curvy organic volumes.
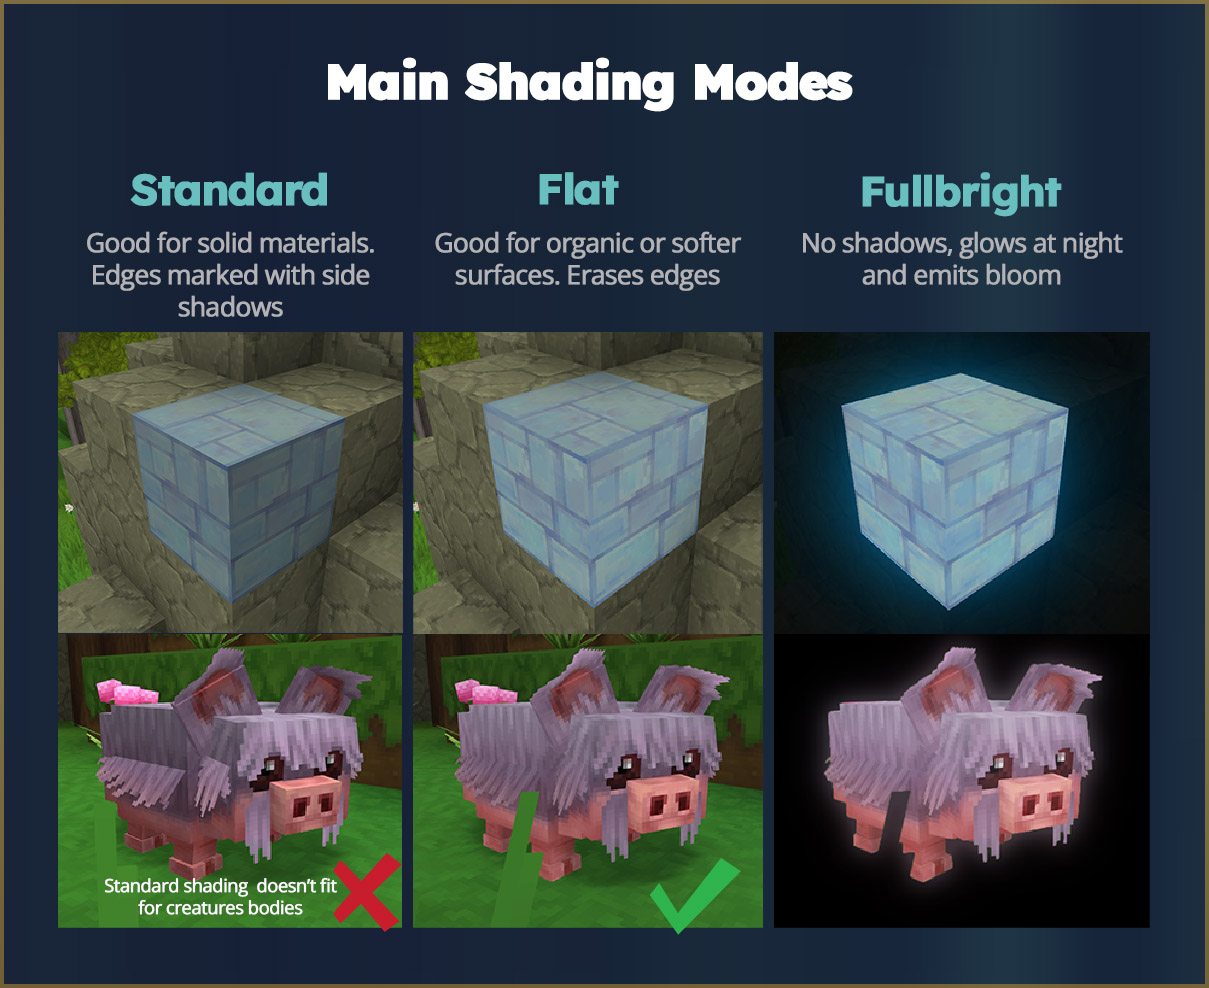
Ingame, for performance and style reasons, we work with a tight set of material types. We call them shading modes. Blockbench isn't able to display these shading modes yet, but you are able to set them and export them for Hytale, for each node of your model!
Videos Tutorial - Thomas Concepting and Modeling of a Magma Golem for Hytale
The Hytale art team's role is also to support the community by sharing our creative vision, our tools, and good practices, so you, whether you are an advanced creator or simply curious, can take the leap and have everything you need to dive into making beautiful models!
We will soon share more about advanced techniques for modelling, animation, VFX, and UI art.
We hope this blogpost will be useful for your future creations and that you will have a good time editing the vast world we built for you!
Attached below are a small selection of models for your enjoyment and tinkering:
